Skip to content
FurMark troubleshooting • safe stress testing • benchmark guidance

Guides & troubleshooting

FurMark can place a graphics card under extreme load. These guides are written to help you use it responsibly: start with short supervised tests, keep monitoring visible, and treat instability or runaway temperatures as stop signals.

Responsible use: Never run unattended high-load tests. If temperatures keep climbing or instability appears, stop the test. For trust and integrity topics, see Trust & Security.

FurMark usage screenshot used in troubleshooting and setup guides.
A safe testing workflow is repeatable, monitored, and escalated step-by-step.

Safe setup: your first baseline run

Use this baseline workflow when testing a new GPU, validating cooling changes, or checking stability after tuning. It’s designed to reduce risk and make results easier to interpret.

  1. Prepare the system: close unnecessary heavy apps, confirm fans are working, and ensure case airflow is unobstructed.
  2. Pick moderate settings: start with a common resolution (e.g., 1080p) and moderate AA. Avoid jumping straight to the most aggressive preset.
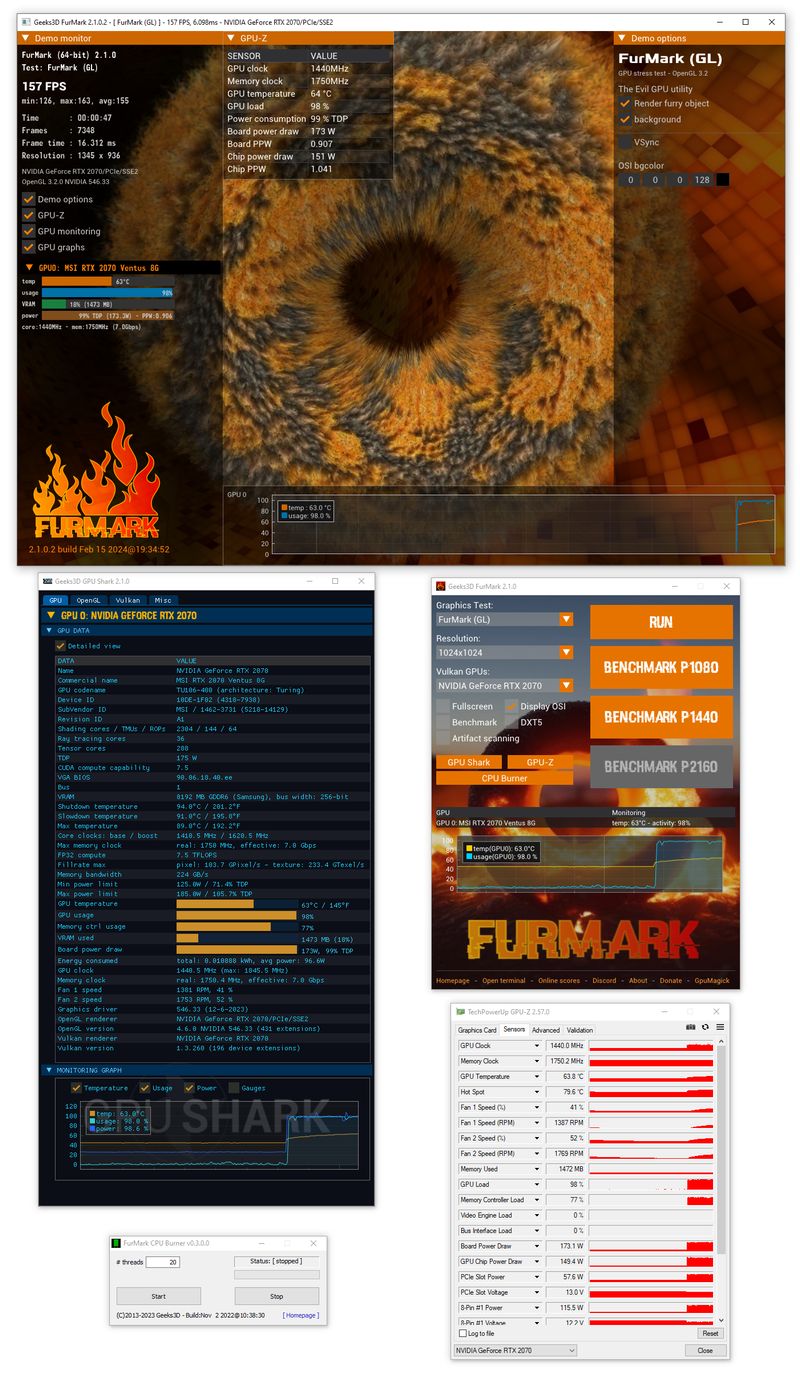
  3. Keep monitoring visible: watch GPU temperature, clocks, usage, fan behavior, and any throttling indicators during the first minutes.
  4. Run a short supervised session: begin with a few minutes. You’re looking for temperature stabilization and stability signals, not maximum pain.
  5. Escalate gradually: only increase resolution/AA if temps are stable and you have a clear reason (e.g., validating cooling headroom).
  6. Document the run: record settings (API mode, resolution, AA, window/fullscreen) and ambient conditions so comparisons stay meaningful.

Stop immediately if you see:

  • Artifacts, flashing blocks, or corrupted geometry
  • Driver resets, black screens, or repeated application crashes
  • Temperatures that keep climbing with no sign of stabilization
  • System freezes, reboots, or instability symptoms

Troubleshooting guides (step-by-step)

Each guide uses numbered steps and prioritizes safe, technically sensible actions.

FurMark will not launch

  1. Reboot once (to clear hung driver state) and try again.
  2. Update GPU drivers using the vendor’s official channel, then retry.
  3. Try both OpenGL and Vulkan modes (if available) to isolate an API-specific issue.
  4. Run with reduced settings (lower resolution, windowed) to confirm the render path is working.
  5. Check for overlays or capture tools that can interfere with rendering; temporarily disable them for testing.
  6. If you recently changed overclock/undervolt settings, revert to a known-stable profile and retest.

If you’re concerned about the download, review antivirus warnings and no-malware clarification.

OpenGL or Vulkan mode issues

  1. Confirm your driver version is current and supports the selected API on your hardware.
  2. If Vulkan fails, try OpenGL with the same resolution/AA to verify basic functionality (and vice versa).
  3. Disable overlays (performance overlays, capture tools) and retry.
  4. Lower intensity (resolution/AA) to reduce chance of immediate instability.
  5. If the issue started after a driver update, test with a different driver version (when feasible) to isolate a regression.

When comparing OpenGL vs Vulkan performance, keep the rest of the test identical and avoid mixing results across different thermals or power limits. This avoids misleading conclusions.

Driver-related launch or rendering problems

  1. Confirm the GPU is detected correctly in the OS and driver panel.
  2. Update to a stable driver branch appropriate for your GPU; avoid stacking multiple driver utilities.
  3. Reset tuning to stock (clocks/voltage/power) to rule out instability.
  4. Try a smaller windowed test to confirm rendering works before escalating load.
  5. If the GPU is new, verify power connectors and seating; instability can look like “software issues.”

If the system reboots or hard-freezes, jump to freeze/reboot guide.

Screen flicker or instability during the test

  1. Stop the test. Do not “power through” flicker or corruption.
  2. Reduce settings (resolution/AA) and retest for a shorter duration.
  3. Revert tuning to a stable profile; flicker can indicate unstable clocks or voltage.
  4. Check temperatures and fan response. Heat-related instability often escalates over time.
  5. Try the other API mode (OpenGL/Vulkan) to see if behavior changes.

If you see artifacts, use the artifact guide.

Temperatures rising too quickly

  1. Stop the test if temperatures keep climbing and don’t stabilize.
  2. Lower intensity (reduce resolution/AA; use a shorter duration) to establish a safer baseline.
  3. Check fan operation and airflow: case intake/exhaust, GPU fan curve, dust filters, and clearance.
  4. If you recently repasted or changed a cooler, verify mounting pressure and contact; re-check after the system cools down.
  5. Consider ambient room temperature and case placement. Small changes can affect stability under heavy load.

If you’re new to stress testing, keep runs short and supervised. The goal is validationnot maximum heat. See best practices.

System freeze, reboot, or crash during testing

  1. Reduce load immediately: lower resolution/AA and shorten the run. Retest only under supervision.
  2. Revert GPU tuning to stock and retest. Borderline overclocks often fail under sustained load.
  3. Check power stability: confirm GPU power connectors are seated and the PSU is adequate for the configuration.
  4. Monitor temperatures; heat can trigger instability or throttling behavior that looks like “random crashes.”
  5. If crashes persist even at mild settings, consider testing with a different driver version or verifying hardware seating.

A hard freeze or reboot is a signal to treat the system as unstable under load. Don’t extend durations until you can complete short runs consistently.

Artifacts appearing under load

  1. Stop the testartifacts are a stability red flag.
  2. Return clocks/voltage to a known-stable baseline and retest a short session.
  3. Reduce settings (resolution/AA) to see whether the issue is intensity-dependent.
  4. Check temperatures. Heat can trigger instability that looks like corruption.
  5. If artifacts persist at stock and mild settings, consider driver changes and hardware checks.

Also review FAQ: what to do if artifacts appear.

Benchmark score lower than expected

  1. Confirm settings match: same API mode, resolution, AA, fullscreen/windowed, and duration.
  2. Repeat runs after the GPU reaches a similar temperature. Warm vs cool runs can differ.
  3. Check for throttling: high temperature or power limits can reduce clocks and lower scores.
  4. Close background tasks and overlays that can steal resources.
  5. Don’t compare across different drivers or game-mode settings without noting the change.

For a “compare like-for-like” mindset, see repeatable test checklist.

Fans becoming too loud

  1. Understand the cause: heavy load increases heat; fans respond to keep temperatures controlled.
  2. Lower settings for baseline testing; high resolution/AA can increase heat quickly.
  3. Review fan curves and case airflow; better airflow can reduce required fan speed.
  4. Don’t extend stress tests solely to “see how loud it gets.” Keep the goal diagnostic and time-bounded.

Test settings too aggressive for a system

  1. Reduce resolution/AA and retest a short session.
  2. Switch to windowed mode to lower intensity and keep monitoring visible.
  3. Use benchmark mode for timed comparisons rather than long stress sessions.
  4. Only increase intensity when you have stable, repeatable baseline results.

Antivirus warning or browser download warning concerns

  1. Pause and verify source. Avoid repackaged installers or unclear mirrors.
  2. If hashes/checksums are published for the release, use them to verify integrity.
  3. Compare file name and version to the release context on the download page.
  4. Use multi-signal thinking: source reputation + integrity + consistent release details.
  5. If you’re still unsure, don’t run the file. Seek confirmation from reputable sources or wait for clarity.

More context on the Download page: false positives explained.

Benchmark mode vs stress-test mode confusion

  1. Stress test: prioritize stability and thermal behavior under sustained load.
  2. Benchmark mode: use timed runs for comparisons; keep settings consistent.
  3. Use stress tests to validate “can it hold stable under load?” and benchmarks to compare “how does this configuration perform?”
  4. When in doubt, start with short stress tests and only extend durations when temperatures stabilize and you have a reason.

See benchmark feature context and best practices.

Common problems (summary cards)

If you’re skimming, start with these and click through to the detailed steps above.

Best practices for FurMark testing

  • Start short: begin with brief supervised tests before extending duration.
  • Watch temperatures continuously: treat thermals as a live safety signal, not a post-run statistic.
  • Stop on runaway heat: if temperatures keep rising abnormally, end the run and reduce load.
  • Avoid reckless max-load testing: especially on poorly cooled systems or unknown stability profiles.
  • Compare logically: don’t obsess over one scoreensure the test conditions match and interpret changes carefully.
  • Test after changes carefully: drivers, cooling, and tuning changes should be validated with short runs first.

Monitoring checklist

Keep these visible during your runs. They help you decide when to stop or when results are comparable.

Thermals

GPU temperature (and hot-spot if available), plus whether temperatures stabilize vs keep climbing.

Clocks & power behavior

Core/memory clocks, power limit behavior, and signs of throttling or abrupt drops.

Stability signals

Artifacts, driver resets, black screens, freezes, or repeated app crashes.

Repeatable test checklist

Repeatability is what turns “a run” into useful diagnostic evidence. Use the same settings and document what changed.

  • Same API mode (OpenGL or Vulkan)
  • Same resolution, AA, and fullscreen/windowed
  • Similar ambient temperature and fan curve behavior
  • Document driver version and tuning profile used

How to use FurMark responsibly

FurMark is designed to heavily load the GPU. Use it as a diagnostic tool with clear goals, short supervised runs, and constant monitoring. If you’re inexperienced with stress testing, avoid long sessions and avoid “max settings” runs until you understand your cooling and stability baseline.

When to stop

Runaway temperatures, artifacts, driver resets, crashes, or any unsafe behavior.

Who should be cautious

Users with unknown cooling, unstable tuning, or limited monitoring experience.

Supervised testing

Never run unattended; keep sensors visible and treat safety signals seriously.